

If you're reading this, you're likely already curious about Farcaster Frames. For those who aren't familiar, start with a quick overview at the Farcaster Frames Documentation.
What We Will Build
In this tutorial, we will be building a frame that lets users flip a coin and see the result. Users can flip the coin multiple times.
Fairly simple.
This is the rough lifecycle of the 'app':

And this is how it will look:


Step 1: Initialize Next.js Project
You've probably done this a thousand times before. We're gonna use the App Router, so make sure you select that in the CLI when prompted.
pnpm create next-app
Step 2: Install Dependencies
To make it easier to work with the Farcaster Frames Standard, we will be using some utilities provided by the @coinbase/onchainkit npm package. Install this dependency.
pnpm add @coinbase/onchainkit
That's the only dependency we will need for this project.
Start the Next.js dev server now too:
pnpm dev
Step 3: Expose Localhost To The Internet
Unfortunately, there are no tools that let you test out & debug your frames locally yet. Our best bet is to use the Warpcast Frame Validator.
In order to debug a localhost site using the Warpcast Frame Validator, we will have to expose our localhost to the internet. I use ngrok for this. Once you sign up, you will find instructions for how to setup ngrok on their dashboard. Just follow them, and use it to expose your port 3000. It will be a command like this:
ngrok http --domain=example-domain.ngrok-free.app 3000
Step 4: Setup Your .env.local File
Create a .env.local file at the root of your project, and add these contents to the file:
File: .env.local
NEXT_PUBLIC_BASE_URL=https://example-domain.ngrok-free.app
Set the NEXT_PUBLIC_BASE_URL env variable to your ngrok URL.
We will need this env variable in our project.
Step 5: Setup The Assets
Each Farcaster Frame requires an image that is presented in the UI by the clients. We will need three different images for our frame. One for the initial 'splash' screen, one for when the result of the coin flip is heads, and one for when the result is tails.
You can either use your own images, or copy over the ones I already created from this folder: https://github.com/Dhaiwat10/coin-flip-farcaster-frame/tree/main/public. The ones you need are splash_image.png, heads.png, and tails.png. Put these inside of your public folder.
Step 6: Build The Initial Frame
Our initial frame will look like this:
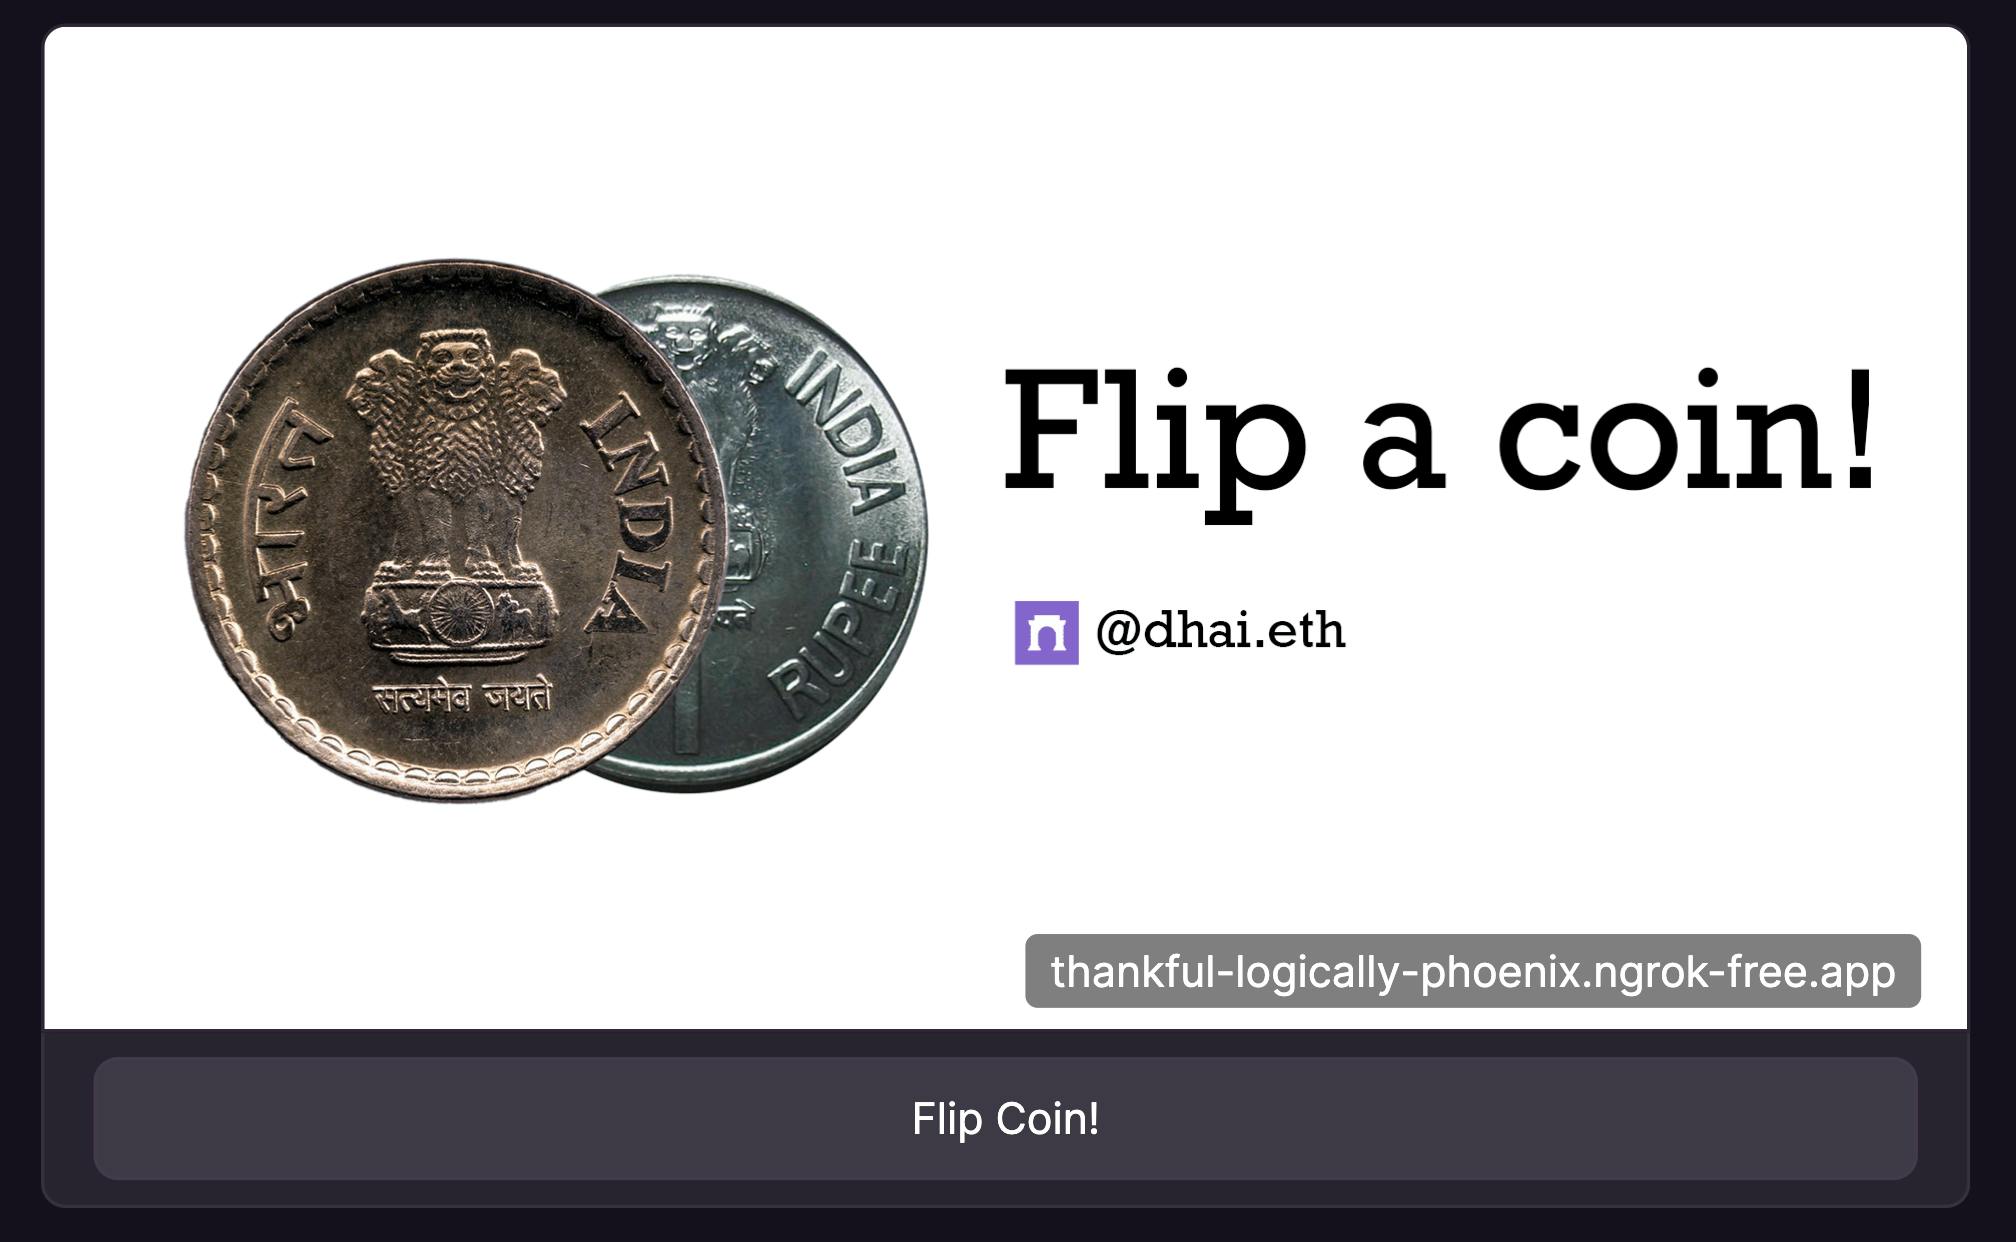
There are two things here: an image, and a button.
Most frames are as simple as that. Let's code this out.
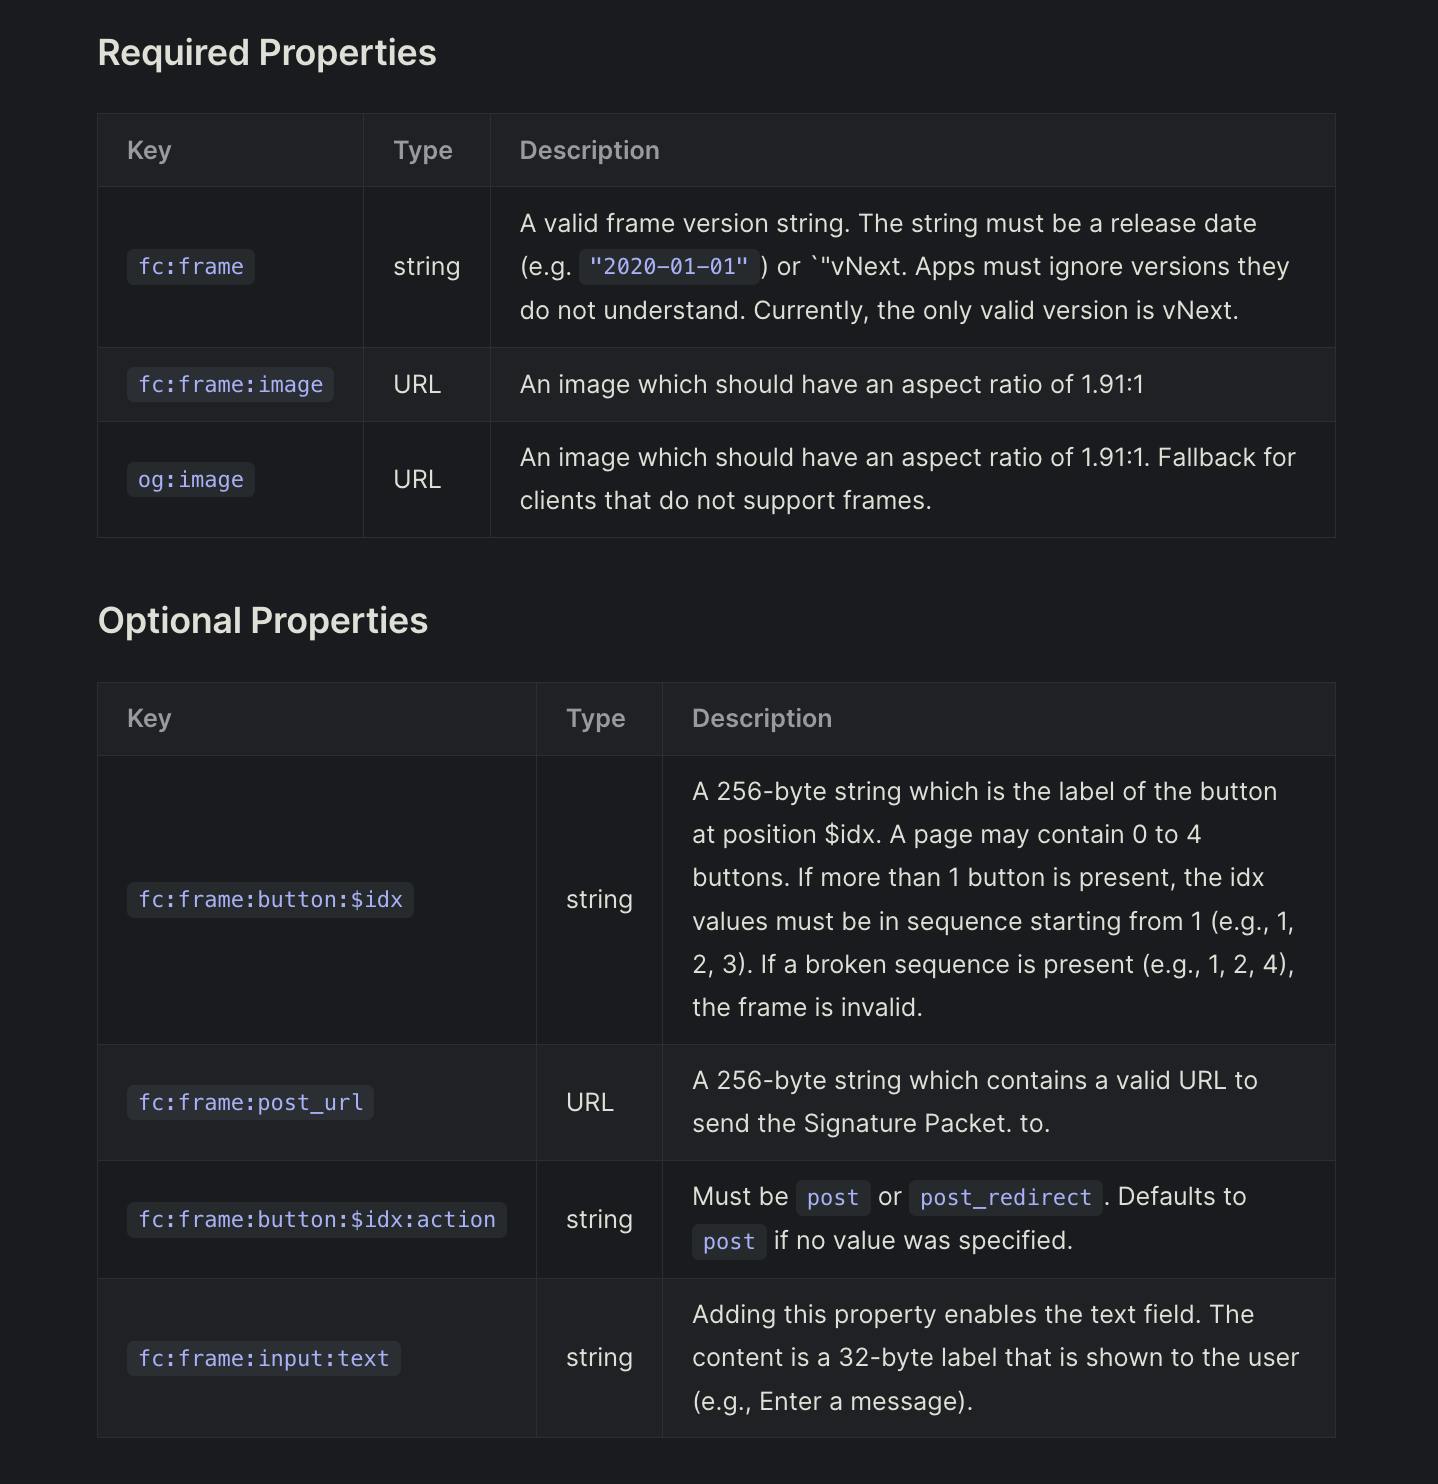
According to the Farcaster Frames specs, a URL is considered a valid Farcaster Frame if it returns some certain <meta> tags:
Let's setup these <meta> tags for our initial frame. We will use the getFrameMetadata helper from onchainkit for this task.
File: src/app/page.tsx
import { getFrameMetadata } from '@coinbase/onchainkit';

const NEXT_PUBLIC_URL = process.env.NEXT_PUBLIC_BASE_URL;

const frameMetadata = getFrameMetadata({
  buttons: [
    {
      label: 'Flip Coin!',
    },
  ],
  image: `${NEXT_PUBLIC_URL}/splash_image.png`,
  post_url: `${NEXT_PUBLIC_URL}/api/frame`,
});
Now, we will return this metadata from our page so that whenever someone makes a GET request to our / route, a valid Farcaster Frame is returned.
File: src/app/page.tsx
import { getFrameMetadata } from '@coinbase/onchainkit';
import type { Metadata } from 'next';

const NEXT_PUBLIC_URL = process.env.NEXT_PUBLIC_BASE_URL;

const frameMetadata = getFrameMetadata({
  buttons: [
    {
      label: 'Flip Coin!',
    },
  ],
  image: `${NEXT_PUBLIC_URL}/splash_image.png`,
  post_url: `${NEXT_PUBLIC_URL}/api/frame`,
});

export const metadata: Metadata = {
  title: 'Coin flip frame',
  description: 'Heads or tails? Find out!',
  openGraph: {
    title: 'Coin flip frame',
    description: 'Heads or tails? Find out!',
    images: [`${NEXT_PUBLIC_URL}/splash_image.png`],
  },
  other: {
    ...frameMetadata,
  },
};

export default function Page() {
  return (
    <>
      <h1>Coin Flip frame</h1>
      <p>Simply cast this URL to embed a coin flip in your cast!</p>
    </>
  );
}
Since we are using the Next.js App Router, we can easily set the metadata for our page by exporting a const named metadata.
You might have noticed that we set the post_url field to the /api/frame route on line 13. That's the URL our frame will 'post' to whenever someone clicks our button, i.e. the 'response frame'. Let's build out this route.
Step 7: Build The Response Frame
This is what our Response Frame will look like:

Create a new file at src/app/api/frame/route.ts:
File: src/app/api/frame/route.ts
import { NextRequest, NextResponse } from 'next/server';

const NEXT_PUBLIC_URL = process.env.NEXT_PUBLIC_BASE_URL;

export async function POST(req: NextRequest): Promise<Response> {
    // this is where our logic will go
}

export const dynamic = 'force-dynamic';
Exporting a function named
POSTenables our route to respond to any incomingPOSTrequests.force-dynamicmakes sure that no responses are cached.
Let's add in all the logic now, piece-by-piece.
Our first concern is to read the incoming request's data, and make sure that it is a valid request coming from a Farcaster Frame interaction. We want to return a 400 straight away in case it isn't.
File: src/app/api/frame/route.ts
import {
  FrameRequest,
  getFrameMessage
} from '@coinbase/onchainkit';

export async function POST(req: NextRequest): Promise<Response> {
  const body: FrameRequest = await req.json();

  const { isValid } = await getFrameMessage(body, {
    neynarApiKey: "NEYNAR_ONCHAIN_KIT", // you can also your own Neynar API key here
  });

  if (!isValid) {
    return new NextResponse('Invalid request', { status: 400 });
  }
}
Now, let's do the actual coin flip.
const coinFlip = Math.random() > 0.5 ? 'heads' : 'tails';
The last step is to return the result back as a frame. We will also include a button that lets the user flip a coin again if they want!
File: src/app/api/frame/route.ts
import {
  FrameRequest,
  getFrameMessage,
  getFrameHtmlResponse,
} from '@coinbase/onchainkit';
import { NextRequest, NextResponse } from 'next/server';

const NEXT_PUBLIC_URL = process.env.NEXT_PUBLIC_BASE_URL;

export async function POST(req: NextRequest): Promise<Response> {
  const body: FrameRequest = await req.json();

  const { isValid } = await getFrameMessage(body, {
    neynarApiKey: "NEYNAR_ONCHAIN_KIT",
  });

  if (!isValid) {
    return new NextResponse('Invalid request', { status: 400 });
  }

  const coinFlip = Math.random() > 0.5 ? 'heads' : 'tails';

  return new NextResponse(
    getFrameHtmlResponse({
      buttons: [
        {
          label: 'Flip Again!',
        },
      ],
      image: `${NEXT_PUBLIC_URL}/${coinFlip}.png`,
      post_url: `${NEXT_PUBLIC_URL}/api/frame`,
    })
  );
}

export const dynamic = 'force-dynamic';
Since the post_url is set to /api/frame, the same route will be hit again when the user clicks the 'Flip again!' button and the response frame will be returned again.
Step 8: Prod Deployment
Now, you can deploy your Next.js app to Vercel and once you get a deployment URL, set the NEXT_PUBLIC_BASE_URL environment variable on Vercel to your deployment URL. eg. if your Vercel URL is https://example-vercel-domain.vercel.app, then set NEXT_PUBLIC_BASE_URL to https://example-vercel-domain.vercel.app from your Vercel dashboard.
Once you do this, your frame should be perfectly deployed at that URL. Any casts containing this URL will make your frame appear on the feed.
Congratulations, you just built and deployed your first Farcaster frame!
If you found this guide helpful, drop me a follow:
Repo For Reference
https://github.com/dhaiwat10/coin-flip-farcaster-frame/